Motivation
I think there are many reasons to decide and take on a professional certification: learning, enhancing your resumé, being strongly advised by your management for a given position, etc.
In my case, it was rather curiosity: my employer announced this summer they would pay for a Google certification, there was a choice of 3 as far as I remember: Professional Cloud Architect, Security Engineer, and Data Engineer.
I have a decent AWS and Terraform experience (3+ years of professional experience), same for Kubernetes, and I played around with Google Cloud several times. Could be interesting and should be a walk in the park, right? Well… so I thought 😖 ..
Going through all the certification program stages
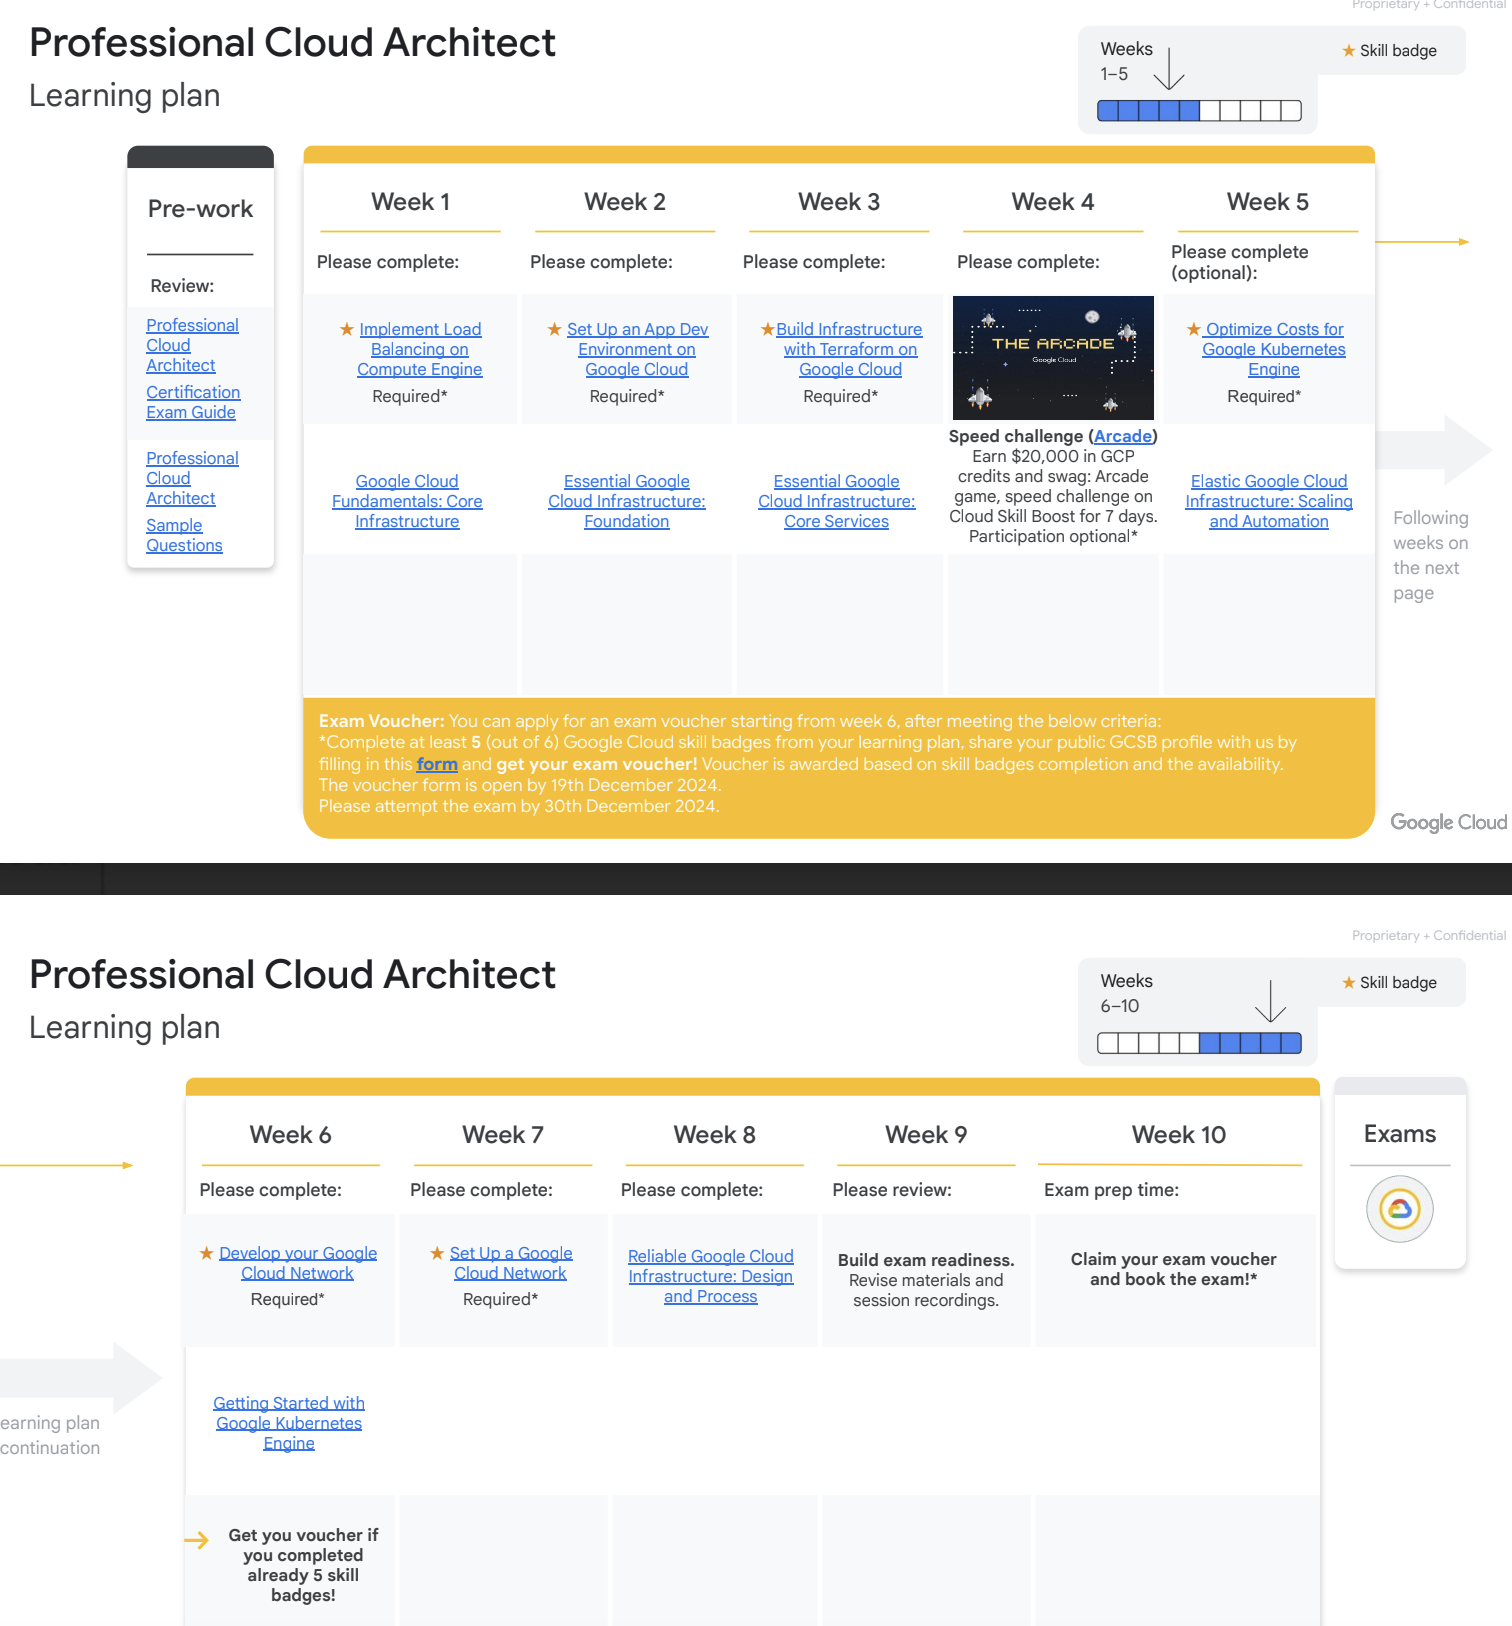
After I registered for the program (July 16th), I was accepted into a cohort (August 19th) for a Stage 1 (few labs to complete in 7 days) that eventually gave access to the main event: Stage 2 where lessons would be given every week (until November) with an instructor, and at least 5 badges (out of 6) should be earned before asking a voucher for the 2 hours long multiple choices proctored exam (latest date December 30th)
So it’s a 6-month long experience, lessons are recorded in case you can’t make room for the Stage-2 2 hours long 10AM to 12PM weekly Tuesday class (I could not attend any of them 😩), and the badges can be earned when you complete a series of labs, some of them being almost 8 hours long!
The classes
Well, I skipped them, so I can’t really describe them 😅 ; but one thing you should know: they’re about preparing the exam, not hands on Google Cloud services; for this you have the self paced labs and their badges
The labs
For the most part, they’re pretty interesting: you receive Cloud Credits that you can spend on labs; each lab will then provision a temporary account (for 30mn to 2 hours), where you’ll discover Google Cloud Services through exercises using the Google Cloud console (the GUI), or the Google Cloud shell (a shell that has access to your temporary account / project) or even Terraform.
During all the labs, you’ll have a checkpoint button that will verify your progress – it usually works fine, but sometimes, it can take time to discover you did what was asked…
Labs are usually pretty easy, sometimes boring (repeating the same steps several times) you just need to follow through the steps. Except for the final lab of a series!!! This one does not guide you, and it can be challenging (but more interesting, as you need to apply your experience and previously acquired knowledge)
I completed 5 out of the 6 labs (I failed the last lab of a series 😞 and never re tried it… yet, cause I think I still can if I want with my remaining credits; talking about the credits, there are people actively looking for some, look at this Google Cloud community) and then my Google Cloud profile got updated with those badges, as well as another service named Credly that does link to your Google Account to display your badges too. It’s kind of confusing there are 2 different places to showcase your badges – just make sure you create your Credly account because this is where your Certification diploma will be uploaded.
After those labs were completed and those badges acquired, I had the opportunity to fill in a Google form to ask for a voucher to register for the exam.
Problem was it was already December 16th and my agenda only allowed me to choose December 24th for the exam date: I had 8 days (but truly only 3 cause I was working) to prepare for the exam 😱
Preparing for the exam
I decided to use external resources rather then the recorded sessions to fill the gap. I wanted to go through the maximum of mock exams.
Here are the external resources I used:
- Google Cloud Certified Professional Cloud Architect Study Guide: Second Edition, by Dan Sullivan – a bit outdated (published in 2022, by December 2024, many services were renamed – like Dataprep integrated into BigQuery – or even discontinued – like Stackdriver debugger) but I began realizing through some mock exams that I absolutely needed to learn, fast, a lot of services that were not covered in the labs!
- I quickly glanced through this other preparation book, Professional Cloud Architect Google Cloud Certification Guide – Second Edition, different style of questions, helpful too
- I spent a lot of time on Udemy Practice exams, I liked the questions even though the solutions are pretty barebone, with just a link to the doc…but after 3 or 4 mock exams, the questions were the same more or less.
- I also practiced on Whizlab, just the exam preparation tests – the solutions were better explained, but as all other resources, it was sometimes a bit deprecated
Among those 4 resources, I can not tell you which one better prepared me versus the other ones; I think with all of them I learned about new services or scenarios (a significant part of the exam preparation revolved around 4 case studies, where you need to know what’s the best GCP service , or combination of services – Pub/Sub + GCS + Dataflow + Big Query is always a winner 😊 – for a given business or technical requirement).
To gauge if you’re sufficiently prepared, make sure you don’t learn anything new when taking a mock exam – if so, you still have some learning and training to do.
Most mock exams gave more than 4 answers, or sometimes even allowed several correct answers: the real exam only ever had 4 answers, and only 1 to choose from.
Finally, there are a decent number of sites, blog posts on the internet about this certification; most of them a bit outdated, but they still helped:
- A good blog post with plenty of interesting links for the exam
- A list of other very good resources to learn about GCP services
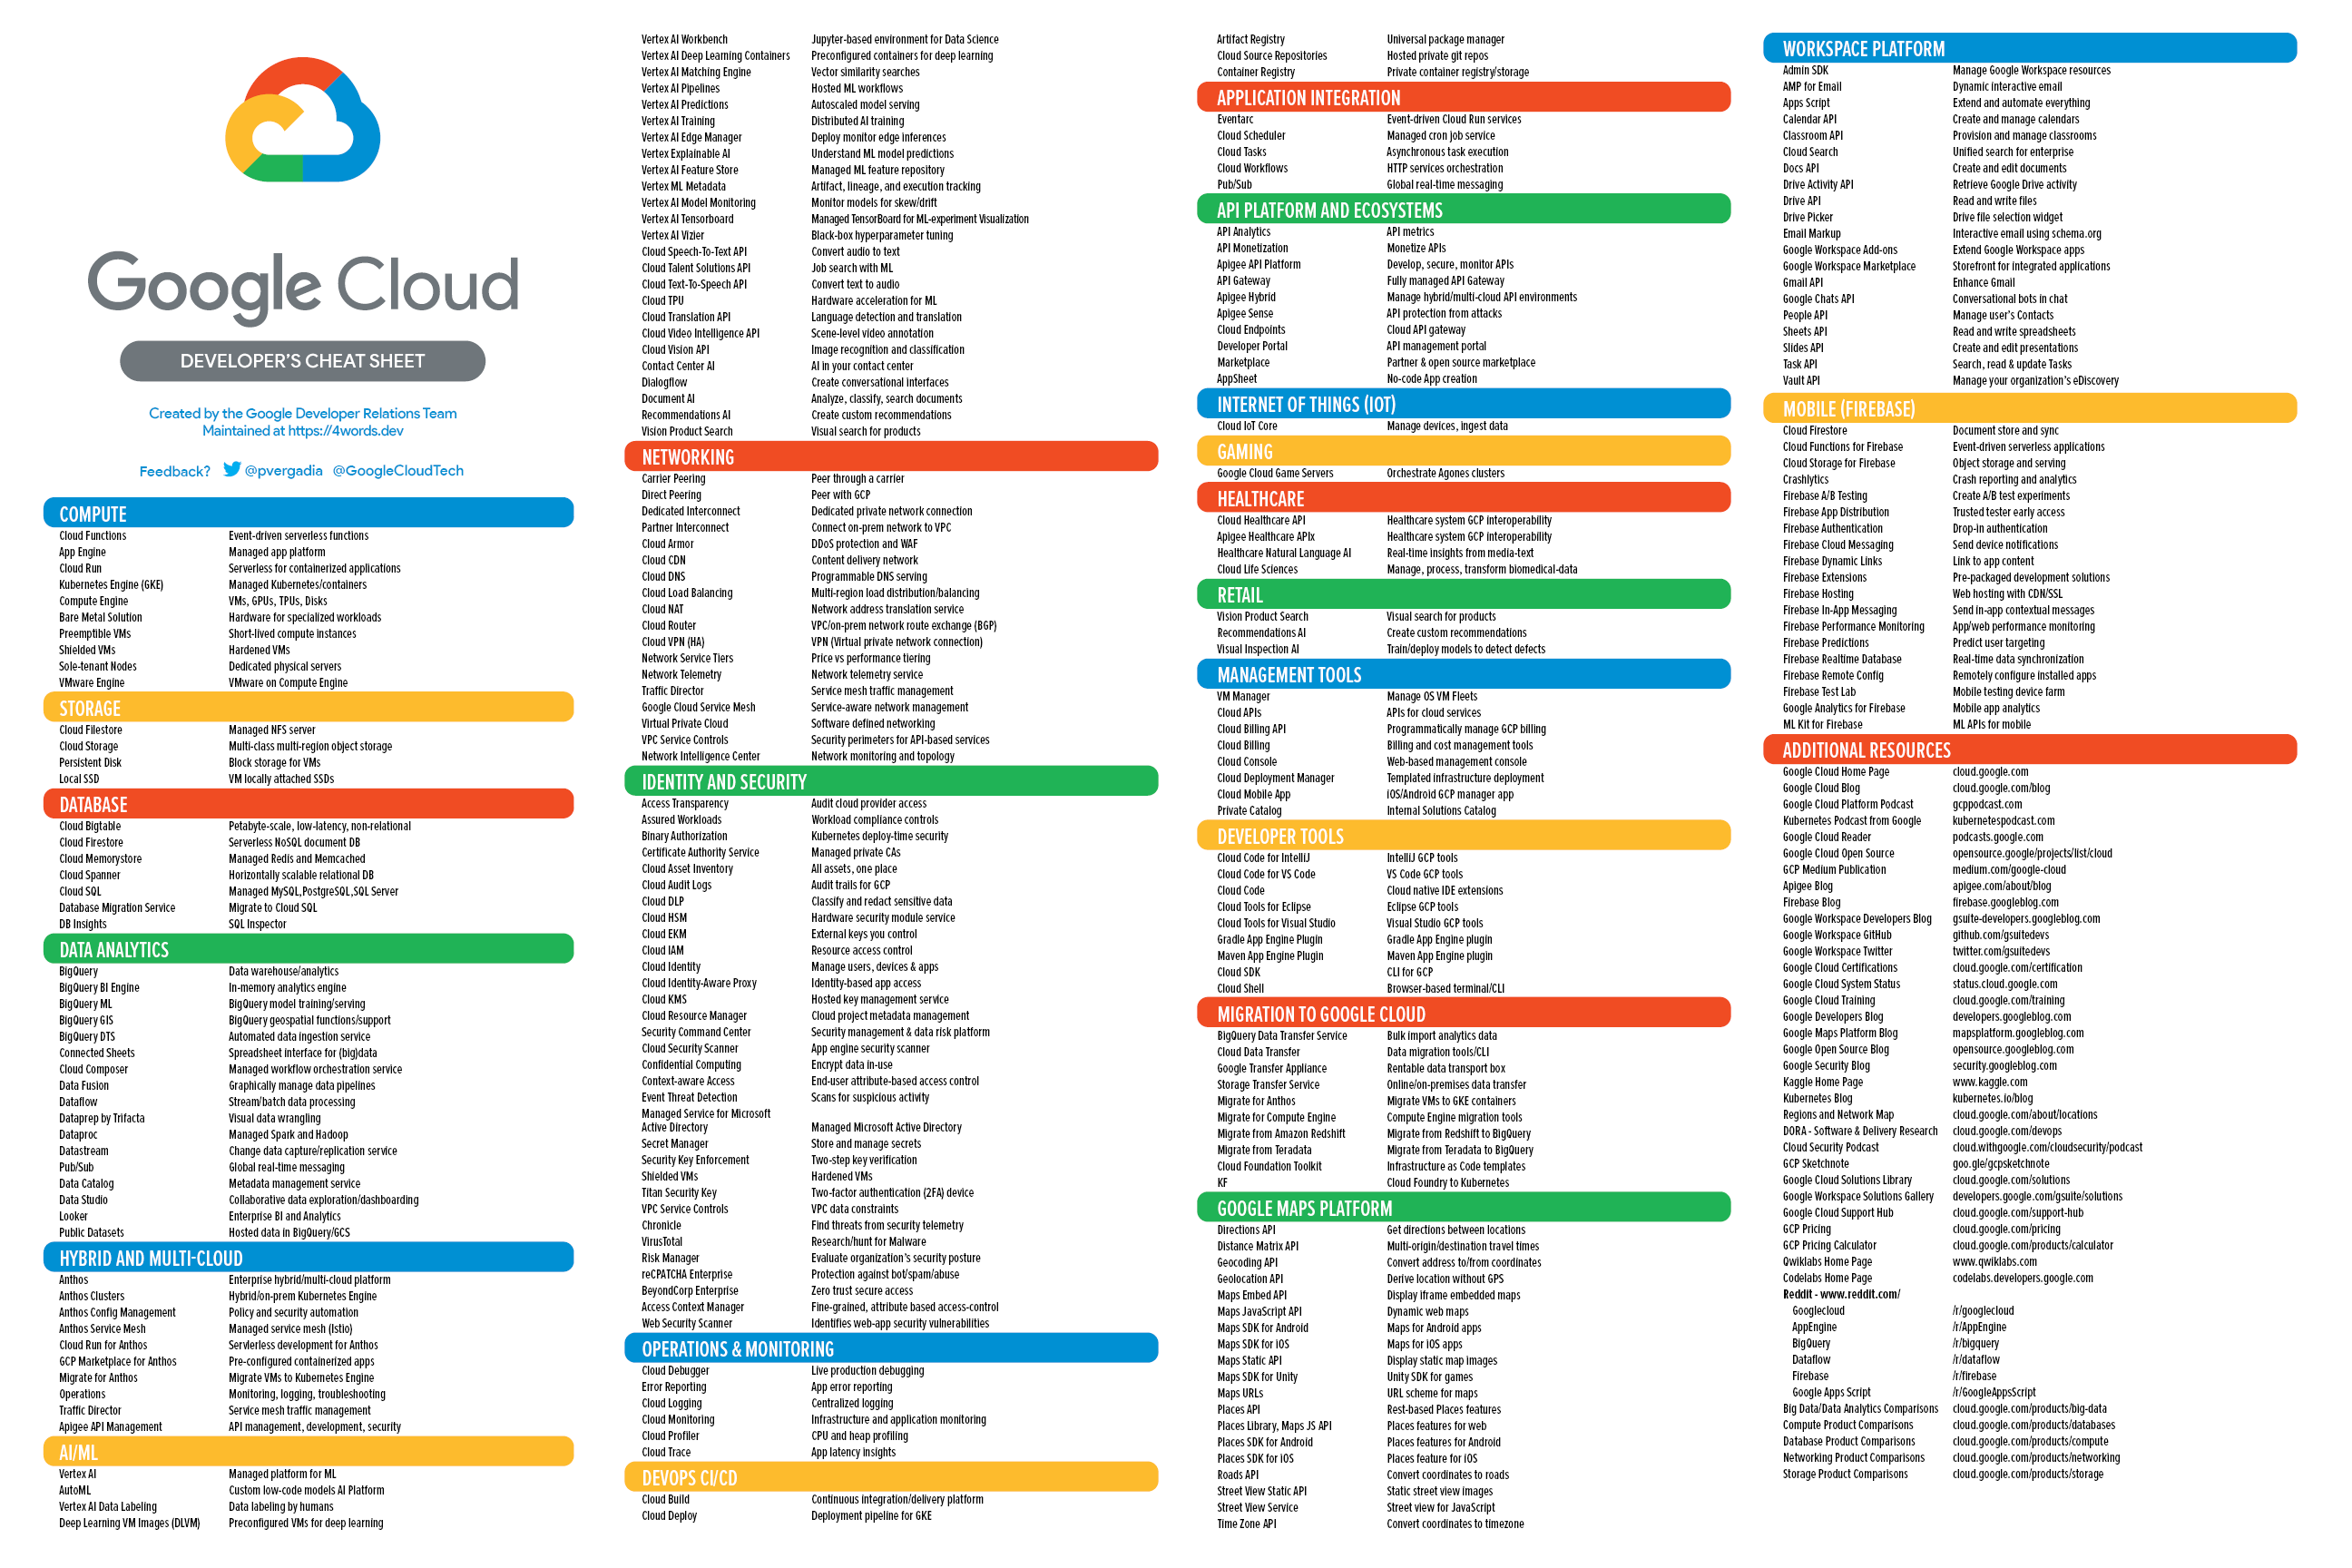
- A list of services you should be familiar with before taking the exam
The exam
The exam is provided by CertMetrics and you can either take it online of in presence. I chose online because there was no availability in presence in Montréal in the next 2 weeks.
Online exam software
You should really follow their advice and use a personal computer, because they (CertMetrics / WebAssessor) will make you install a « OEMSafeBrowser » that is an evolved spyware to make sure you only access the exam and they can see and hear you during the whole exam (it’s no joke, during one question I repeated the answers aloud and they asked me to stop talking!).
You also need to be in a closed room where you’ll show them (using your webcam) you don’t have food nor any phones nor any papers around you!💂
Final note: I tried Firefox and Safari to start the exam (link to open the safe browser), supposedly they’re supported, but only Chrome worked – took me 15mn to figure this out, so I was late but hopefully the support delayed my exam. Still, that made me stress, so just use Chrome!
At the end of the exam, you’ll have a « conditional » result (after being asked to answer a satisfaction form!); I had the PASS result, so I was very much relieved 🥳 – few days later you’ll receive a Credly badge.
Types of Questions asked
20% of the 50 questions were about the 2 of the 4 case studies. But the questions were not the typical questions found in the online resources I used and they were not obvious either. Read carefully, every word matters.
The questions were only 4 answers quizzes, with only 1 answer to choose – that part was easier than most of the mock exam I prepared with (some of them had questions with 7 answers and 4 to choose!). The most similar exam was the mock exam from Google.
I found the questions to be quite difficult during the exam – about the renamed products, don’t worry about it, the questions use old and new naming.
Final words
Trying to get up to speed in 3 or 4 full days (not counting the labs) was extremely challenging, so try and prepare on a longer period than this, it’s not technically difficult, but there’s a lot of products to remember, many of them you’ll never have used during the labs, and have confusing and similar names (Cloud Dataflow is based on Apache Beam, but Cloud Composer is based on Apache AirFlow 🫠 – AppEngine Flexible is about running containers, the same as CloudRun – while AppEngine classic is a PaaS that supports a limited number of languages 😥 )
From my own experience (I am maintaining Java buildpacks , but used to be an application/cloud architect and devops), I have learnt a few interesting details on CloudStorage (similar but different from AWS S3) and Big Query and some privacy and AI services. I can’t say I’ve learnt much about application architecture, since it was pretty basic (« use managed services », « use PubSub and different zones to scale » etc. ) and the Big Data part was pretty limited to « use BigTable to insert, BigQuery to query analytics » 🤷 . Also, as an application developer, I can’t say I need to know that Cloud Interconnect is better than a (HA) VPN when peering with Google Cloud with 10Gbps needs or that Cloud Identity interfaces with Microsoft Active Directory… I don’t take this kind of company infrastructure decision.
Do certifications matter to you? to your employer? to your future employer? If so, go ahead (I was surprised to see sites such as Coursera, Udemy and Whizlab advertise that certifications will get you a better job or better salary – when I used to interview people, I didn’t really care about their certifications, I know it’s mostly theoretic knowledge that can’t beat experience)
I enjoyed most of the labs honestly, pretty interesting, but knowing about all Google Cloud services and their names of the moment…well I guess I now know what this certification is about!
Bonus: my notes
A list of all the notes I took and reviewed before the exam; could be helpful to you!
|
1 2 3 4 5 6 7 8 9 10 11 12 13 14 15 16 17 18 19 20 21 22 23 24 25 26 27 28 29 30 31 32 33 34 35 36 37 38 39 40 41 42 43 44 45 46 47 48 49 50 51 52 53 54 55 56 57 58 59 60 61 62 63 64 65 66 67 68 69 70 71 72 73 74 75 76 77 78 79 80 81 82 83 84 85 86 87 88 89 90 91 92 93 94 95 96 97 98 99 100 101 102 103 104 105 106 107 108 109 110 111 112 113 114 115 116 117 118 119 120 121 122 123 124 125 126 |
Compute App Engine standard does not support custom containers - flexible does App Engine standard can scale to 0; flexible minimum 1 App Engine standard, min cost 15mn, are deployed to specified instance classes. .NET not supported (flexible does) Unmanaged instance groups can have nonidentical instances; Unmanaged instance groups do not offer autoscaling, autohealing, rolling update support, multi-zone support, or the use of instance templates and are not a good fit for deploying highly available and scalable workloads. Use unmanaged instance groups if you need to apply load balancing to groups of heterogeneous instances, or if you need to manage the instances yourself. Compute Engine VMs do not come with stackdriver logging agent installed - but all other services do Cloud Run binary authorization: only trusted images (in a given repository) can be run Cloud Functions don't need a VPC! GKE Workload Identity: associate k8s service account with GCP service account Shielded VM offers verifiable integrity of your Compute Engine VM instances, so you can be confident your instances haven't been compromised by boot- or kernel-level malware or rootkits - Secure Boot, Virtual trusted platform module(vTPM)-, Integrity monitoring Misc. StackDriver Logging provides an agent that can be installed on AWS EC2s and GCP CEs. The agent can ingest log data from either type of VM. Each project ID is unique across Google Cloud. After you have created a project, you can delete the project but its ID can never be used again. Deployment Manager: Terraform copycat - only manage GCP resources - deleting everything is a risk Lift and SHift? Migrate to cloud gsutil being replaced with gcloud storage CloudBuild can not deploy local workloads Organization, then multiple folders for each department; each department can have multiple teams and projects Storage you can't migrate to CloudSQL to offload read operations; read replicas better CloudSQL: on demand AND automated backups Cloud Dataflow is an Apache Beam implem. - implement data workflows, most similar to Cloud Data Fusion - an ETL - for stream and batch Cloud Composer: Apache airflow, a workflow orchestration system that executes workflows represented as directed acyclic graphs (DAGs) , fully managed workflow orchestration service that empowers you to author, schedule, and monitor pipelines Cloud Dataproc can replace self-managed Spark and Hadoop clusters, can connect to BigTable, Bigquery, Storage - it is region specific, not multi region Cloud Firestore document DB, eq. MongoDB Cloud Memorystore: redis, valkey, memcached Cloud Pub/Sub can be used instead of RabbitMQ. Cloud Bigtable is a scalable, wide-column database designed for low-latency writes, making it a good choice for time-series data OR IoT storage, Each cluster is located in a single zone. Big table better to ingest the data than Big query better to request it, Apache HBase library for Java can insert to BiGtable Cloud Spanner A distributed clock called TrueTime guarantees transactions are strongly consistent even across regions. Cloud Datastore , same as Firebase, Highly scalable NoSQL database BigQuery : several types of partioning : sharded, vertical, horizontal; If you need interactive querying in an online analytical processing (OLAP) system, consider BigQuery. Region and multi region Big Query billing export Storage: nearline, coldline, archive, max size 5TB for an object - buckets can be regional, multi regional, dual regional - GCS signed URL - buckets are immutable, Storage has global consistency, but does not provide CDN capability You cannot use your own keys with local SSDs because local SSDs do not persist beyond the life of a virtual machine Cloud Dataparse is not Cloud Dataprep. Cloud Dataparse does not exist, Dataprep is now BigQuery Persistent disks support zonal and regional sync. replications MongoDB Atlas, 3rd party managed MongoDB, in competition with Firestore Storage Transfer Service to to regularly sync external data with Storage AI CloudDatalab now Vertex AI workbench provides a Jupyter notebook-based environment DocumentAI can convert images to text, classify documents, analyze and extract entities Networking if you need >10 Gbps, then you should consider a Cloud Interconnect solution (same data center) - Partner Interconnect the same, but using a link from your DC to Google's via a partner private line - over a VPN solution, which works up to about 3 Gbps for each VPN tunnel. Cloud VPN is regional; for optimal performance, place resources and VPN gateway in the same region Premium network tier: Google internal network (Standard over public internet) Cloud Armor prevents DDOS Cloud Security Scanner : identifies security vulnerabilities in your App Engine, Google Kubernetes Engine (GKE), and Compute Engine web applications VPC service controls to limit access from VMs to Storage for example, or from VMs to specific remote APIs Default and implied VPC rules for default network: egress to internet, ICMP, RDP and SSH incoming from internet Identity-Aware Proxy (IAP) connector allows you to manage access to HTTP-based apps outside of Google Cloud; and let service accounts propagate from apps to resources Identity Aware Proxy (IAP) lets you use SSH or RDP to non public IP machines via HTTPS and IAM Multi Region: CDN better than multi region storage bucket IPv6 in almost all services but not: CloudSQL, MemoryStore, ClassicVPN Cloud VPN: ClassicVPN and HA VPN The region Montreal has 3 zones in 1 or several data centers Dual regions do not exist everywhere, single continent You can connect to the serial console using the Google Cloud Console, the gcloud command-line tool, or a third-party SSH client VPC networks are global resources. Each VPC network consists of one or more IP address ranges called subnets. Subnets are regional resources, and have IP address ranges associated with them. Subnets are regional resources, and they can have Private Google Access to Storage for example, without an external IP CloudDNS supports logging and monitoring, and autoscaling to handle query volume, 100% availability CloudNAT to access internet from non external IP machines Dual-Zones and Multi-Zones do not exist in GCP A project can't access another project's resources unless you use Shared VPC or VPC Network Peering. Simirlarly, a Shared VPC can only be used with the network in the same GCP org; SHared VPC lets create a single global VPC organized by a central project You cannot create a rule to deny all traffic to the entire subnet Apigee -> it's an API gateway Cloud Endpoint: an API management system that helps you secure, monitor, analyze, and set quotas on your APIs using the same infrastructure Google uses for its own APIs. Cloud Endpoint vs APigee: CloudEndpoint is not Hybrid nor does it support monetization Cloud Service Mesh: service mesh on GCP, GKE, services running on different infra., controlled by an API A network endpoint group (NEG) specifies a group of backend endpoints for a load balancer. A serverless NEG is a backend that points to a Cloud Run, App Engine, Cloud Run functions, or API Gateway service. Security HIPAA: governs, among other things, privacy and data protections for private medical information. Children's Online Privacy Protection Act (COPPA) is a U.S. law that regulates websites that collect personal information to protect children under the age of 13. Cloud HealthCare API - A secure, compliant, fully managed service for ingesting, transforming and storing healthcare data in FHIR, HL7v2, and DICOM formats, and unstructured text. Role. A role is a collection of permissions. Permissions determine what operations are allowed on a resource. When you grant a role to a principal, you grant all the permissions that the role contains. Policy. The allow policy is a collection of role bindings that bind one or more principals to individual roles. When you want to define who (principal) has what type of access (role) on a resource, you create an allow policy and attach it to the resource.3 types of roles: basic or primitive (not recommeneded, too wide), predefined, custom An allow policy, also known as an IAM policy, defines and enforces what roles are granted to which principals. The effective policy for a resource is the union of the policy set at that resource and the policy inherited from higher up in the hierarchy. tokenization: easy way to comply with PII Cloud Secret Manager: to store credentials (like Vault) HSM is Hardware Security Module, integrated with Cloud KMS Best practices Code review of configuration files Monitor app and infra for signs of problems Mean time between failures is a measure of reliability Request success rate is a measure of how many requests were successfully satisfied SLOs with clear and measurable service level indicators Cloud Data Loss Prevention API (DLP API) to obfuscate PII data Subnets not enough for firewall rules; can use tags for source and target exporting daily usage and cost estimates automatically throughout the day to a BigQuery dataset is a good way of providing visibility to the finance department. Labels can then be used to group the costs based on team or cost center. To enhance a Compute Engine machine performance, without restart, you can enlarge the disk to get more IOPS (comes with bigger capacity) Percent Uptime Downtime/Day Downtime/Week Downtime/Month 99.00 14.4 minutes 1.68 hours 7.31 hours 99.90 1.44 minutes 10.08 minutes 43.83 minutes 99.99 8.64 seconds 1.01 minutes 4.38 minutes 99.999 864 millis 6.05 seconds 26.3 seconds 99.9999 86.4 millis 604.8 millis 2.63 seconds 4 scenarios * TerramEarth increase fleet cellular connectivity GCS, Dataflow, BigQuery, Pub/Sub Move to container * Helicopter Racing League use Transcoder API CDN + Armor, Storage, Cloud Load Balancing BigQuery + Dataflow + Composer * MountKirkGames using VMs for the old games, move to Kubernetes for the new game use DataFlow for Stream and batch GCS, DataFlow, BigQuery, Pub/Sub * EHR Healthcare Already moved to Kubernetes |